Editing Technique: Rubber banding audio
I lost my cool a little bit in our above episodes of Film Stuff, which covers life in the editing room. I mentioned something in part 1 about how so many Korean editors do not rubber band their audio, and after I said it, I realized you might not know what in the heck rubber banding is.
If you're an editor, first of all, you are extremely talented and good looking and the world needs more of you, you sexy, sexy beast. You already know about rubber banding, I'm sure, because you're so good looking and talented (and did I mention good looking?), so you can skip this email.
If you're not an editor, no worries! I'm going to teach you how to rubber band like you were born to do it.
First of all, what is rubber banding?

This is my Final Cut Pro timeline. Y'all know by now we use Final Cut Pro X, right? Well, Premiere Pro will have this feature too. In fact, almost every video editing program out there will have this feature, because rubber banding is such an important thing.
Anyway, this is my timeline. Those colored blocks are clips from the podcast you listened to (go listen to part 2 if you haven't yet!). The green one is a music track. The blue one called "Editor" is Soo Zee and me talking. The grey bits in between are blank spots of silence.
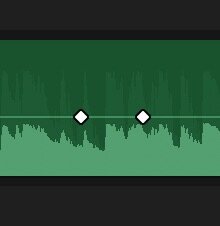
You see that line in the middle of the green track? the one that has some white dots on it? Well, that line is called your rubber band. Those dots are called keyframes.

The rubber band is like an actual rubber band, and it can bend around keyframes. Add a keyframe, and it acts as an anchor. You can move the rubber band around without messing up the part that came before it. It's not so different from actually bending a physical rubber band around some pegs, like you'd see on this geoboard to the left.
In this case, the rubber band is the visual representation of my song's volume. Super not important, but in case you're curious, volume is measured in decibels, abbreviated dB in Final Cut.
When you first bring a song into your timeline Final Cut, it comes in at 0dB, which means you've changed the volume by 0 decibels. It's basically at full volume. If sound was a cup, 0 decibels is a cup that's 3/4 full. It looks like this.

If you let your mouse just hang out over the rubber band in FCP it'll show you what level your volume is. 0dB is way too loud for background music, so I have to lower the level by dragging it down to something more reasonable, say -21dB. That would look like this.

But wait! There's parts where Soo Zee and I talk, and parts where we don't. When we're not talking, we should raise the audio back to 0dB, and when we start talking, we should lower the volume back down to -21dB.
That's where keyframes come in. To lower the volume of one part of the song without affecting the part that came before it, you add a keyframe. In FCP, you do that by right clicking on the rubber band where you want the keyframe to appear. Right click! One key frame in! Right click again! Two keyframes! You should have something like this.
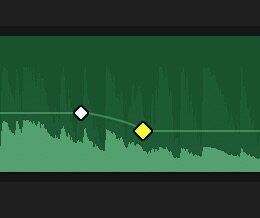
Drag the rubber band to the right of your second keyframe back down to -21dB. Boom! You just rubber banded!
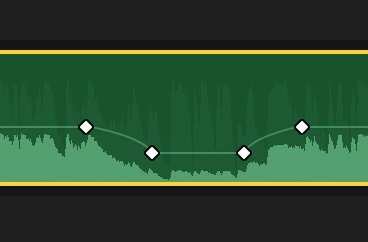
When it's time to go back up in volume, you do the same thing, only instead of dragging the rubber band down to make it quieter, you drag it back up to make it louder.
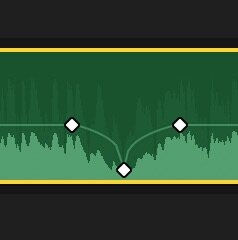
You almost always want to rubber band in even numbers, because then you get nice, smooth curvy changes in volume. It gets quiet, stays quiet, then gets loud and stays loud. If you only use three keyframes to do that, it gets quiet and the loud again immediately afterwards. Not good.
This is sometimes called a notch, because it looks like...you guessed it: a notch.

Okay, back to the part of the podcast where I complained about rubber banding. Look at this picture of my timeline in FCP again. Notice anything odd? Weird? Infuriating to editors like me?

There it is! In between the 00:02:30:00 and the 00:02:40:00 mark, the blue clip of Soo Zee and me talking starts, but the music volume/rubber band doesn't go back down! Bad editing. And if you go back and listen to that part of the podcast, it's obvious. You can't tell what I'm saying because the volume of the music is too loud.
An editor could have told you that just by looking at the rubber bands, without even listening to the clip. Good, polished editing would look more like this part that came earlier in the podcast, where the volume/rubber band for the song (the blue clip called "In Pursuit") is lower every time Soo Zee and I start talking again.
See? Much better. And that, my friends, is how to rubber band your audio.
Let me know if you found this useful, and if so I can show you tons more specific editing techniques. If you found it boring, let me know that too! I'll go back to talking about The Matrix!
This post was originally sent as email newsletter to Film Stuff email subscribers.


